1. Project Overview
1.1 Background
Managing hardware health, diagnostics, and support for a fleet of Dell business computers presents significant operational challenges. Without a centralized solution, IT teams must manually address hardware issues, resulting in increased downtime, reactive support workflows, and reduced productivity across the organization.
1.2 The Problem
- Reactive Support Model: Hardware issues discovered only after failures occur
- Manual Diagnostics: IT staff must physically access devices to run diagnostics
- Inconsistent Coverage: Support agents not installed uniformly across devices
- Limited Visibility: No centralized dashboard to monitor fleet health
- Support Overhead: High volume of manual support tickets
1.3 The Solution
This project implements an automated, enterprise-wide deployment of Dell SupportAssist for Business PCs using Microsoft Intune as the deployment platform.
1.4 Key Features Deployed
| Feature | Description | Benefit |
|---|---|---|
| Hardware Diagnostics | Comprehensive hardware testing | Early failure detection |
| Predictive Analytics | AI-driven failure prediction | Prevent downtime |
| Remote Assistance | Secure remote support | Faster resolution |
| Automated Updates | Driver/firmware management | Consistent performance |
2. Objectives
2.1 Primary Objectives
- Deploy Dell SupportAssist to 100% of Dell business devices
- Eliminate manual installation through Intune Win32 app packaging
- Ensure proper dependency management with .NET 8.0 Runtime
- Enable proactive hardware monitoring across the fleet
- Integrate with Dell TechDirect for centralized management
2.2 Success Criteria
| Metric | Target | Measurement |
|---|---|---|
| Deployment Success Rate | ≥ 95% | Intune status reports |
| Dell Device Coverage | 100% | TechDirect device count |
| Installation Failures | Intune failure reports | |
| Service Running State | 100% | Detection script |
3. Architecture & Design
3.1 Deployment Workflow
Three-Part Deployment Process: PART A: Create deployment package using Dell Deployment Package Manager ↓ PART B: Prepare files and create .intunewin package ↓ PART C: Configure and deploy via Microsoft Intune
3.2 Component Dependencies
| Category | Component | Details |
|---|---|---|
| System Requirements | Operating System | Windows 10/11 (64-bit) |
| Hardware | Dell-manufactured device | |
| Network | Internet connectivity | |
| Prerequisites | .NET 8.0 Desktop Runtime | Must install before SupportAssist |
| CAB Files | BASE.cab | Base components (~18 MB) |
| CORE.cab | Core functionality (~14 MB) | |
| FULL.cab | Full feature set (~148 MB) | |
| HWDIAGS.cab | Hardware diagnostics (~124 MB) | |
| INSIGHTS.cab | PC Insights (~18 MB) | |
| RAAS.cab | Self-Healing (~19 MB) |
4. Prerequisites
4.1 Administrative Requirements
| Requirement | Description |
|---|---|
| Microsoft Intune License | Active subscription with device management |
| Intune Administrator Role | Permissions to create/deploy Win32 apps |
| Dell TechDirect Account | Business account with SupportAssist access |
| TechDirect Activation File | Downloaded from TechDirect portal |
4.2 Technical Requirements
| Component | Version | Purpose |
|---|---|---|
| Windows 10/11 | 1809+ | Target OS |
| PowerShell | 5.1+ | Script execution |
| IntuneWinAppUtil | Latest | Win32 packaging |
| .NET 8.0 Runtime | 8.0.x | SupportAssist dependency |
5. Tools & Technologies
| Technology | Purpose |
|---|---|
| Microsoft Intune | Enterprise endpoint management |
| Dell TechDirect | Activation file source |
| Dell Deployment Package Manager | Generate deployment package |
| IntuneWinAppUtil | Win32 Content Prep Tool |
| .NET 8.0 Runtime | Application dependency |
6. Part A: Creating the Deployment Package
Using Dell SupportAssist Deployment Package Manager
Step 1: Download Activation File from TechDirect
Before using the Deployment Package Manager, download an activation file:
- Navigate to https://techdirect.dell.com
- Sign in with your Dell business account
- Navigate to: Connect and manage → Manage PC Fleet → Setup and connect → Download → Activation File
- Download and save the activation file
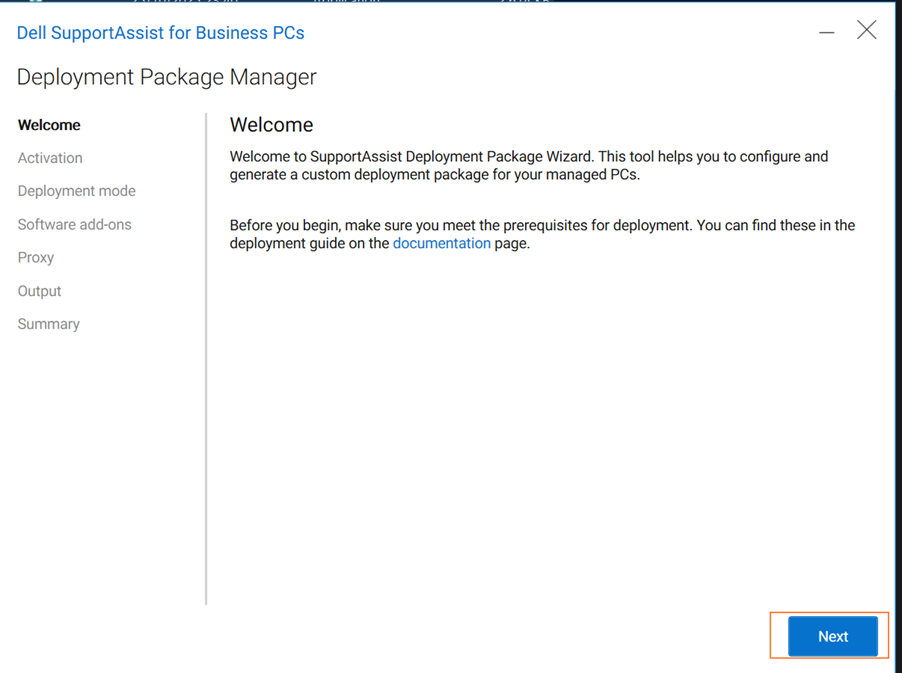
Step 2: Launch Deployment Package Manager - Welcome
Open the Dell SupportAssist for Business PCs - Deployment Package Manager application.
The Welcome screen displays the wizard navigation:
- Welcome
- Activation
- Deployment mode
- Software add-ons
- Proxy
- Output
- Summary
Action: Click Next to proceed.
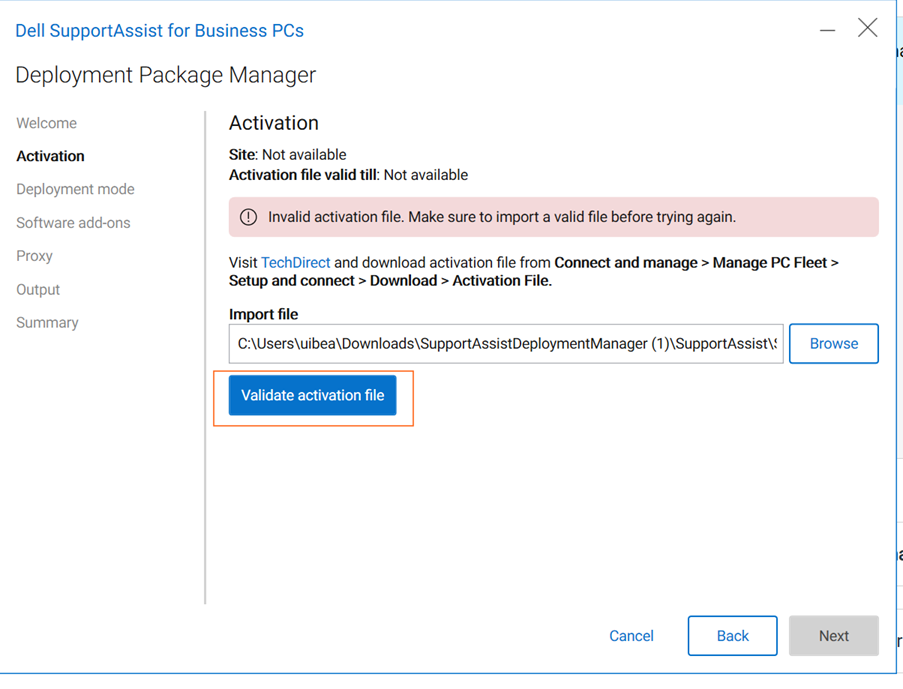
Step 3: Activation - Import Activation File
On the Activation screen:
- Click Browse to locate your activation file
- Select the file downloaded from TechDirect
- Click Validate activation file
If validation fails: "Invalid activation file. Make sure to import a valid file before trying again." Re-download the activation file from TechDirect.
Step 4: Activation - Successful Validation
Once validated, you'll see:
| Field | Example |
|---|---|
| Site | yourdomain.com_1 |
| Activation file valid till | Jan 31, 2027 |
"Activation file was successfully validated."
Action: Click Next to proceed.

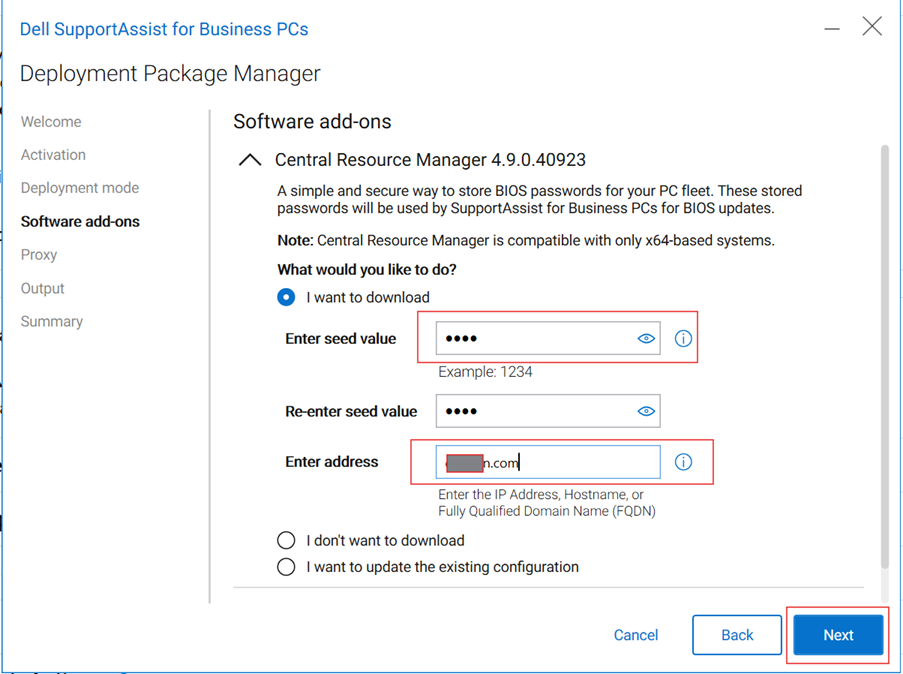
Step 5: Software Add-ons - Central Resource Manager
Configure optional components:
Central Resource Manager 4.9.0.40923
- Provides secure BIOS password storage for your PC fleet
- Required for automated BIOS updates via SupportAssist
- Compatible with x64-based systems only
Options:
- ○ I want to download
- ○ I don't want to download
- ○ I want to update the existing configuration
Additional component: Dell Trusted Device 7.1.4 (optional)

Step 6: Configure Central Resource Manager (If Selected)
If you selected "I want to download":
| Field | Description | Example |
|---|---|---|
| Enter seed value | Numeric encryption seed | •••• |
| Re-enter seed value | Confirm seed | •••• |
| Enter address | IP/Hostname/FQDN | mydomain.com |
Important: Document your seed value securely - needed for BIOS password recovery.
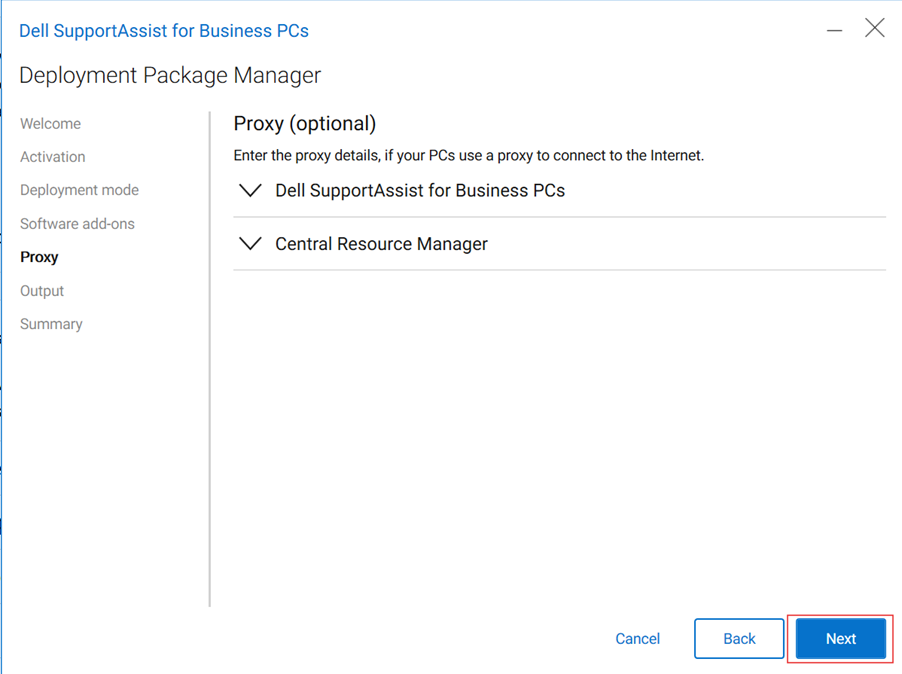
Step 7: Proxy Configuration (Optional)
Configure proxy settings if your organization uses a proxy server.
Expandable sections:
- Dell SupportAssist for Business PCs
- Central Resource Manager
Note: Skip this step if your organization doesn't use a proxy.
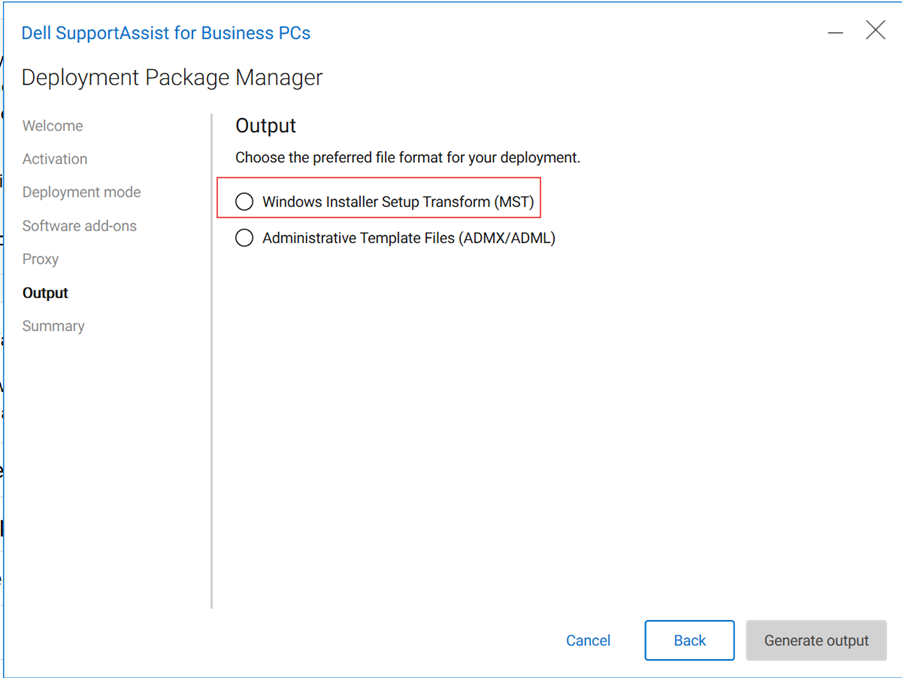
Step 8: Output - Select File Format
Choose the deployment package format:
| Option | Use Case |
|---|---|
| ○ Windows Installer Setup Transform (MST) | Recommended for Intune |
| ○ Administrative Template Files (ADMX/ADML) | Group Policy deployment |
For Microsoft Intune deployment, select: Windows Installer Setup Transform (MST)
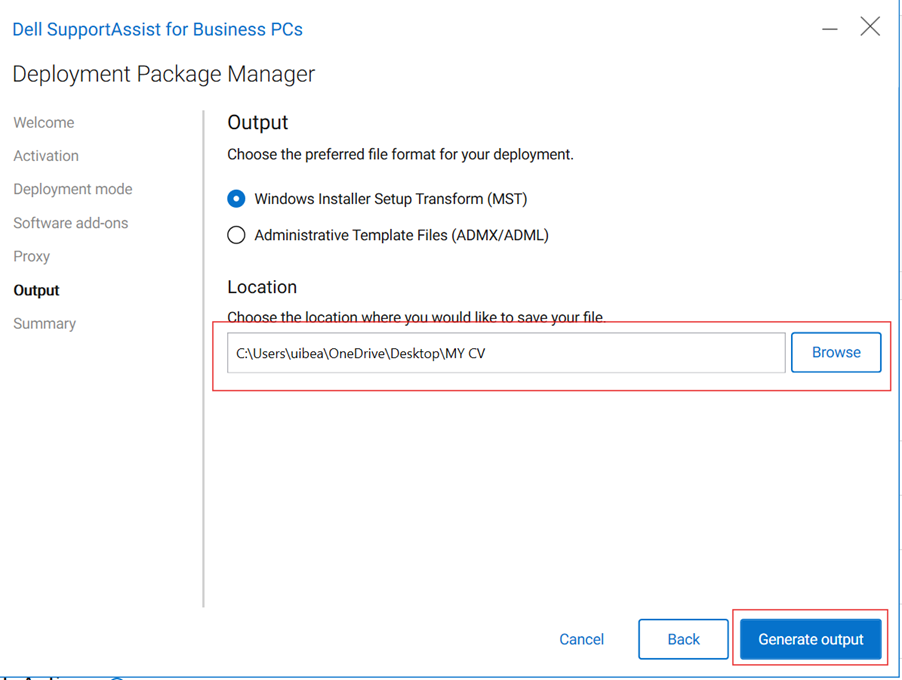
Step 9: Output - Select Save Location
- Click Browse to choose save location
- Select or create a folder
- Click Generate output
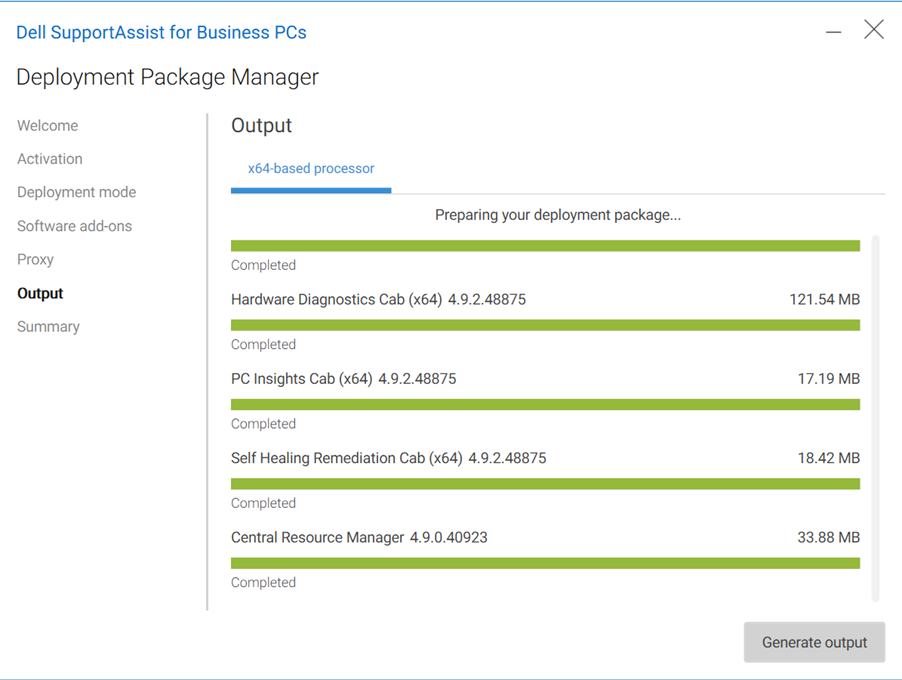
Step 10: Package Generation Progress
The wizard downloads and prepares all components:
| Component | Version | Size | Status |
|---|---|---|---|
| Hardware Diagnostics Cab (x64) | 4.9.2.48875 | 121.54 MB | Completed |
| PC Insights Cab (x64) | 4.9.2.48875 | 17.19 MB | Completed |
| Self Healing Remediation Cab (x64) | 4.9.2.48875 | 18.42 MB | Completed |
| Central Resource Manager | 4.9.0.40923 | 33.88 MB | Completed |
Step 11: Summary - Package Generated
"Your SupportAssist deployment package was successfully generated."
Actions:
- Click View to open output folder
- Click Finish to close wizard
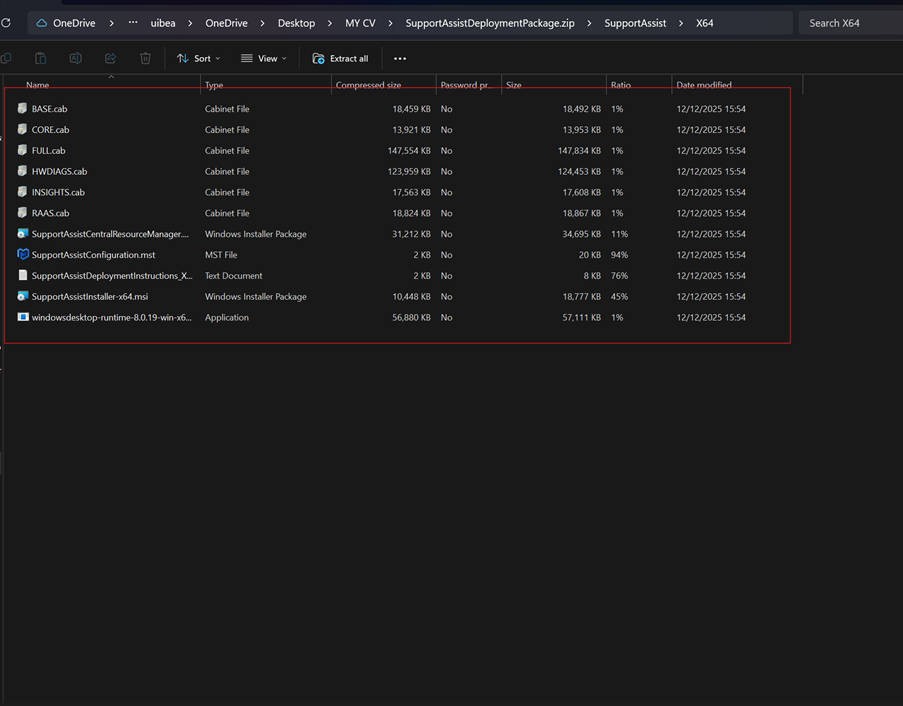
Step 12: Verify Generated Package Contents
Navigate to your output folder and verify all files:
| File Name | Type | Size |
|---|---|---|
| BASE.cab | Cabinet File | 18,492 KB |
| CORE.cab | Cabinet File | 13,953 KB |
| FULL.cab | Cabinet File | 147,834 KB |
| HWDIAGS.cab | Cabinet File | 124,453 KB |
| INSIGHTS.cab | Cabinet File | 17,608 KB |
| RAAS.cab | Cabinet File | 18,867 KB |
| SupportAssistCentralResourceManager.msi | Windows Installer | 34,695 KB |
| SupportAssistConfiguration.mst | MST File | 20 KB |
| SupportAssistInstaller-x64.msi | Windows Installer | 18,777 KB |
| windowsdesktop-runtime-8.0.19-win-x64.exe | Application | 57,111 KB |
7. Part B: Deploy .NET 8.0 Runtime (Standalone)
Prerequisite: Microsoft .NET 8.0 Desktop Runtime
⚠️ Important: .NET 8.0 must be deployed as a separate Win32 app BEFORE deploying SupportAssist.
Step 13: Prepare .NET 8.0 Source Files
# Create .NET 8.0 directory structure
New-Item -Path "E:\IntuneApps\DotNet8\Source" -ItemType Directory -Force
New-Item -Path "E:\IntuneApps\DotNet8\Output" -ItemType Directory -Force

# Copy .NET installer from generated SupportAssist package
Copy-Item "...\X64\windowsdesktop-runtime-8.0.19-win-x64.exe" -Destination "E:\IntuneApps\DotNet8\Source\"
Step 14: Package .NET 8.0 for Intune
cd E:\IntuneApps
IntuneWinAppUtil.exe -c "E:\IntuneApps\DotNet8\Source" -s "windowsdesktop-runtime-8.0.19-win-x64.exe" -o "E:\IntuneApps\DotNet8\Output" -q
Expected: windowsdesktop-runtime-8.0.19-win-x64.intunewin (~55-60 MB)

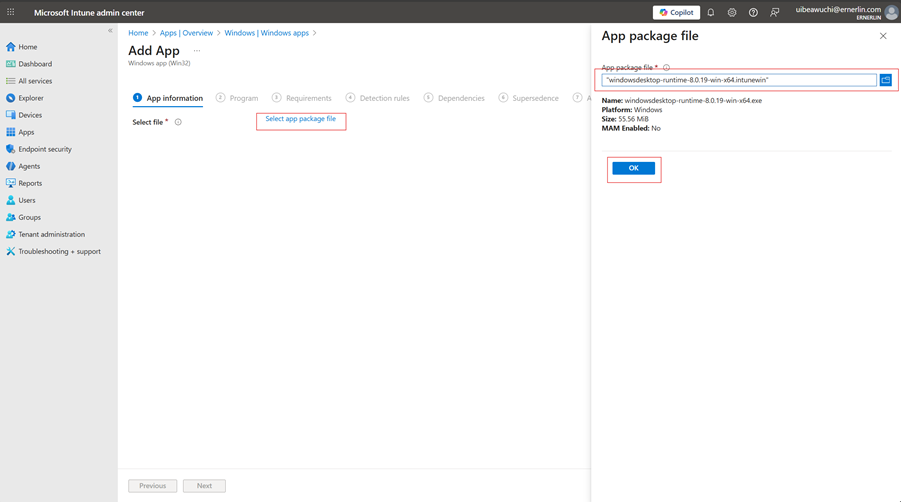
Step 15: Upload .NET 8.0 to Intune
- Navigate to https://intune.microsoft.com
- Go to: Apps → All apps → + Add
- Select: Windows app (Win32)
- Upload: windowsdesktop-runtime-8.0.19-win-x64.intunewin
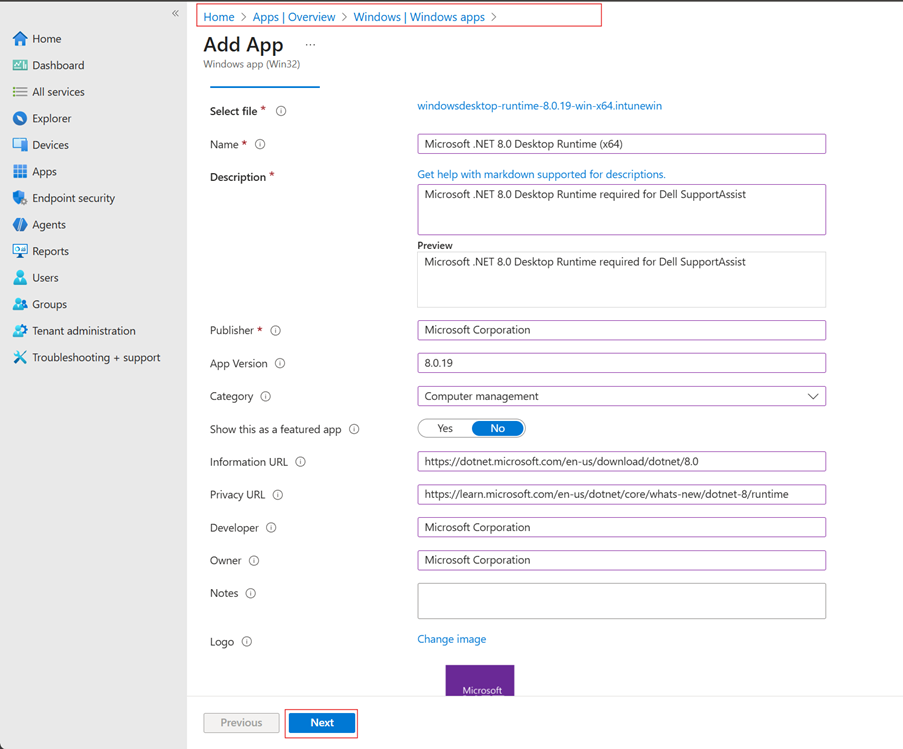
Step 16: Configure .NET 8.0 App Information
| Field | Value |
|---|---|
| Name | Microsoft .NET 8.0 Desktop Runtime (x64) |
| Description | Microsoft .NET 8.0 Desktop Runtime required for Dell SupportAssist |
| Publisher | Microsoft Corporation |
| App Version | 8.0.19 |
| Category | Computer Management |
Step 17: Configure .NET 8.0 Program Settings
| Setting | Value |
|---|---|
| Install Command | windowsdesktop-runtime-8.0.19-win-x64.exe /install /quiet /norestart |
| Uninstall Command | windowsdesktop-runtime-8.0.19-win-x64.exe /uninstall /quiet /norestart |
| Install behavior | System |

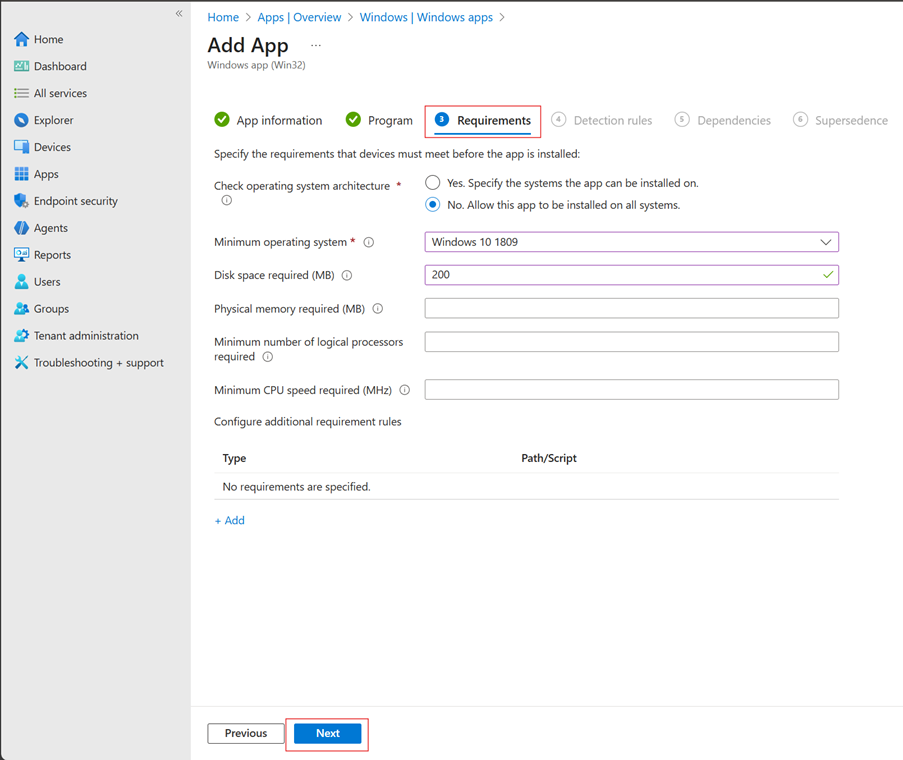
Step 18: Configure .NET 8.0 Requirements
| Setting | Value |
|---|---|
| OS Architecture | 64-bit |
| Minimum OS | Windows 10 1809 |
| Disk Space | 200 MB |
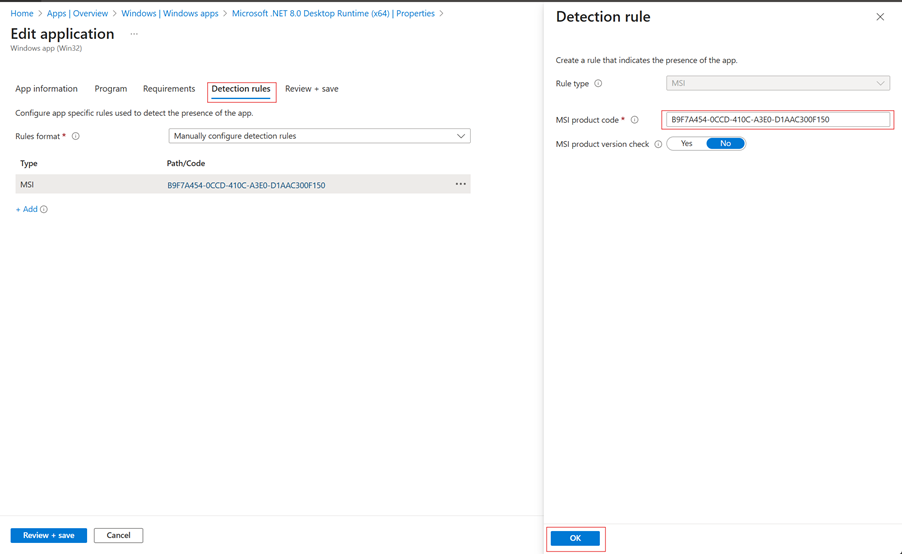
Step 19: Configure .NET 8.0 Detection Rules
| Setting | Value |
|---|---|
| Rule type | MSI |
| MSI Product Code | B9F7A454-0CCD-410C-A3E0-D1AAC300F150 |
| MSI Product Version Check | NO |
Step 20: Configure .NET 8.0 Assignments
- Under Required, click + Add group
- Select: All Devices or your device group
- End user notifications: Hide all toast notifications
Note: Deploy .NET 8.0 to ALL devices (not just Dell) as it's a common prerequisite.
Step 21: Verify .NET 8.0 Deployment
Monitor deployment and verify installation:
# Check if .NET 8.0 is installed dotnet --list-runtimes | Select-String "Microsoft.WindowsDesktop.App 8.0"
8. Part C: Prepare SupportAssist Files for Intune
Creating the .intunewin Package
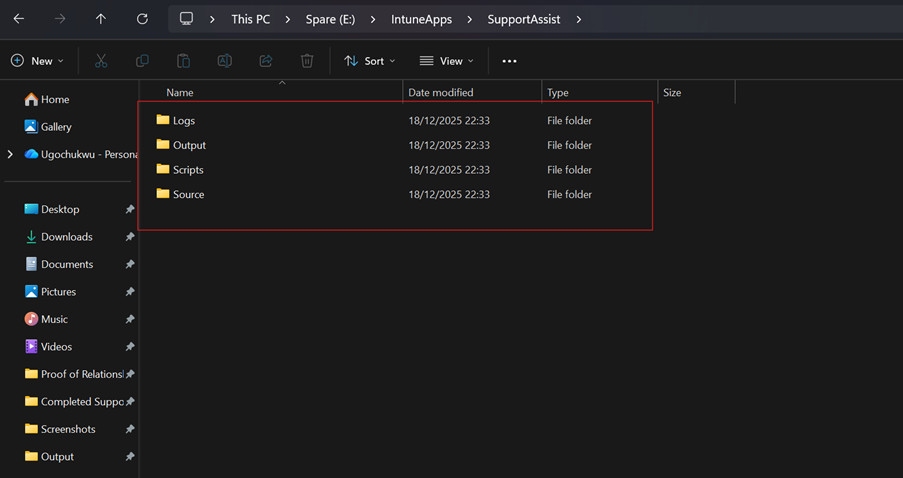
Step 22: Create Working Directory
$basePath = "E:\IntuneApps\SupportAssist"
$folders = @("Source", "Output", "Scripts", "Logs")

foreach ($folder in $folders) {
    $path = Join-Path $basePath $folder
    New-Item -Path $path -ItemType Directory -Force
}
Step 23: Copy Required Files
$sourcePath = "...\SupportAssist\X64"
$destPath = "E:\IntuneApps\SupportAssist\Source"

$files = @(
    "SupportAssistInstaller-x64.msi",
    "SupportAssistConfiguration.mst",
    "BASE.cab",
    "CORE.cab",
    "FULL.cab",
    "HWDIAGS.cab",
    "INSIGHTS.cab",
    "RAAS.cab"
)

foreach ($file in $files) {
    Copy-Item "$sourcePath\$file" -Destination $destPath -Force
}
Step 24: Download IntuneWinAppUtil
$url = "https://github.com/Microsoft/Microsoft-Win32-Content-Prep-Tool/raw/master/IntuneWinAppUtil.exe"
$output = "E:\IntuneApps\IntuneWinAppUtil.exe"
Invoke-WebRequest -Uri $url -OutFile $output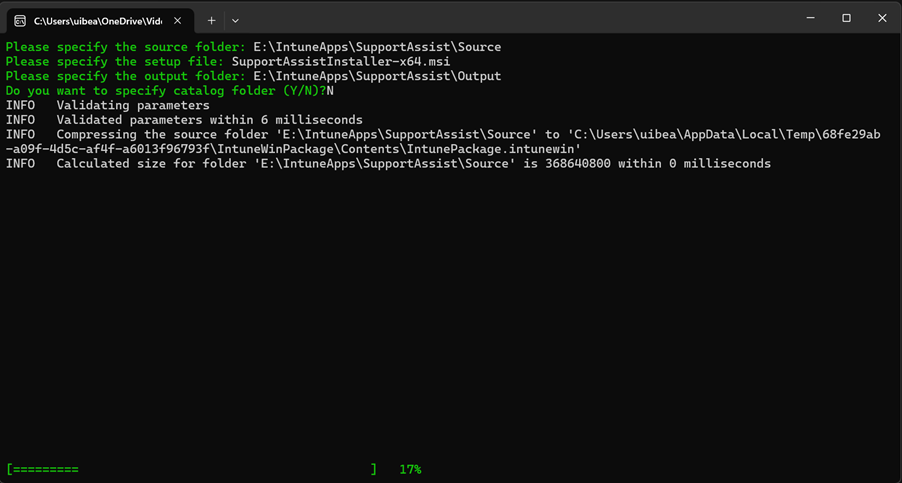
Step 25: Create .intunewin Package
cd C:\IntuneApps
IntuneWinAppUtil.exe -c "E:\IntuneApps\SupportAssist\Source" -s "SupportAssistInstaller-x64.msi" -o "E:\IntuneApps\SupportAssist\Output" -q
Expected: SupportAssistInstaller-x64.intunewin (~300-500 MB)

9. Part D: Configure SupportAssist in Microsoft Intune
Win32 App Deployment
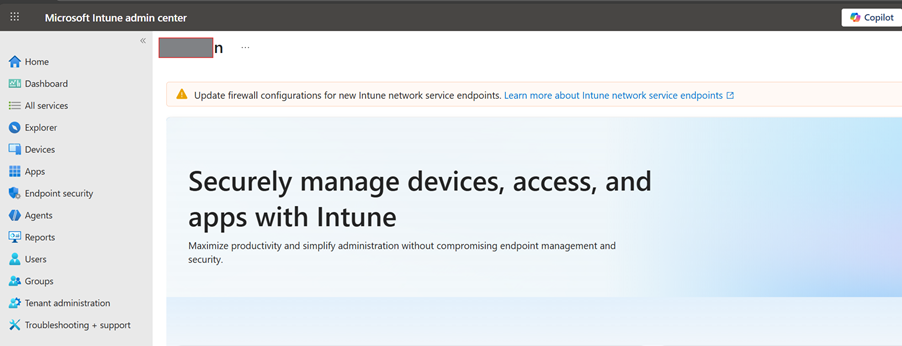
Step 26: Access Intune Admin Center
- Open browser and navigate to: https://intune.microsoft.com
- Sign in with administrator credentials
Step 27: Navigate to Apps
- Click Apps in left navigation
- Click All apps
- Click + Add
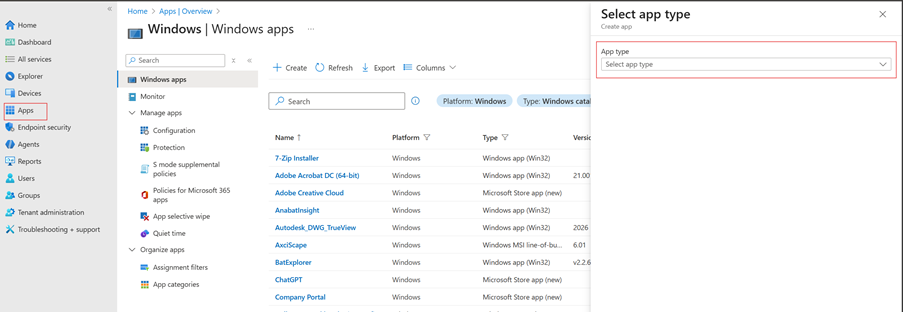
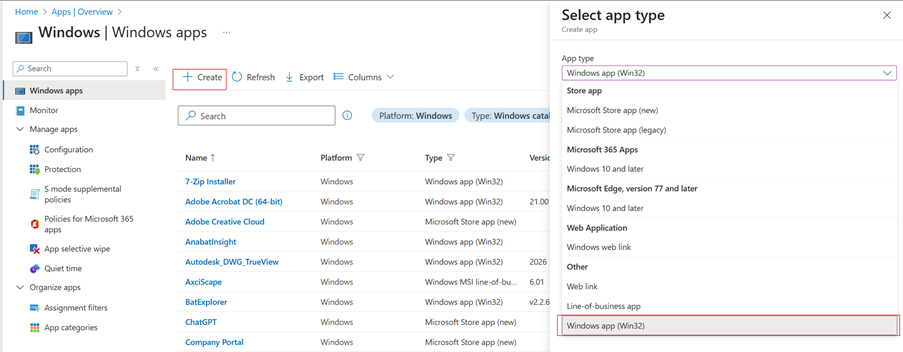
Step 28: Select App Type
- In "Select app type" panel
- Select Windows app (Win32)
- Click Select
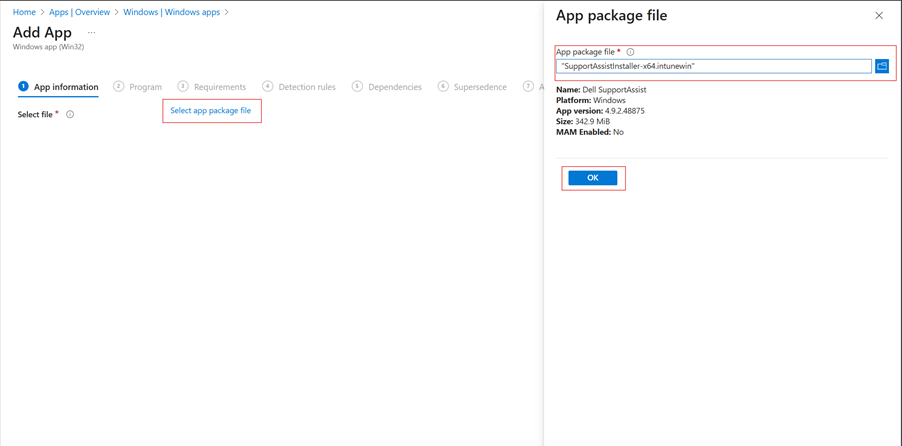
Step 29: Upload Application Package
- Click Select app package file
- Browse to: C:\IntuneApps\SupportAssist\Output\
- Select: SupportAssistInstaller-x64.intunewin
- Ok
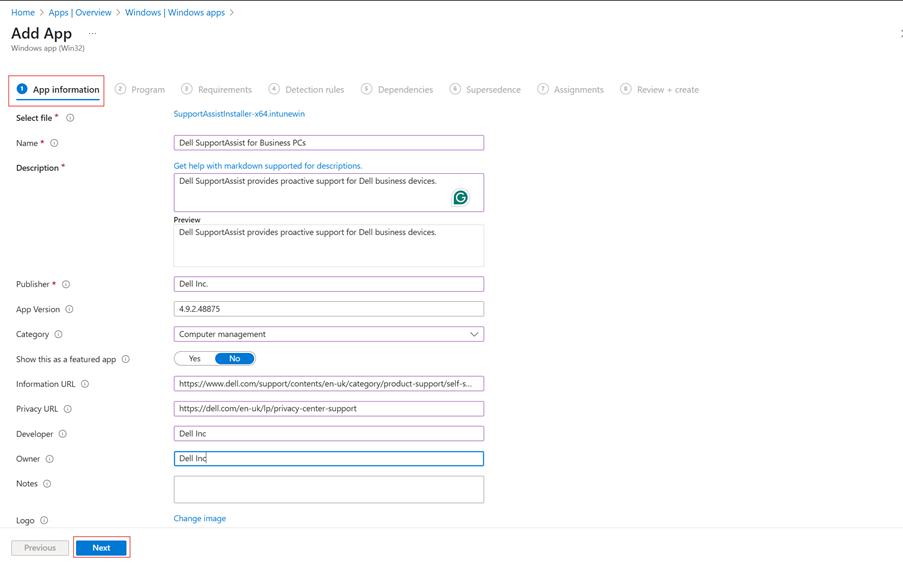
Step 30: Configure App Information
| Field | Value |
|---|---|
| Name | Dell SupportAssist for Business PCs |
| Description | Dell SupportAssist provides proactive support for Dell business devices. |
| Publisher | Dell Inc. |
| App Version | 4.9.2.48875 |
| Category | Computer Management |
Step 31: Configure Program Settings (CRITICAL)
⚠️ Install Command - Most Important Step!
Install Command:
msiexec /i "SupportAssistInstaller-x64.msi" ADDLOCAL="BASE,CORE,FULL,HWDIAGS,INSIGHTS,RAAS" TRANSFORMS="SupportAssistConfiguration.mst" DEPLOYMENTKEY="XXXXXXXX" SOURCE=TechDirect /norestart /qn /l+ "%TEMP%\SupportAssist_Install.log"Uninstall Command:
msiexec /x "{F883F4A3-B6A9-40E8-907E-40B91097982E}" /qn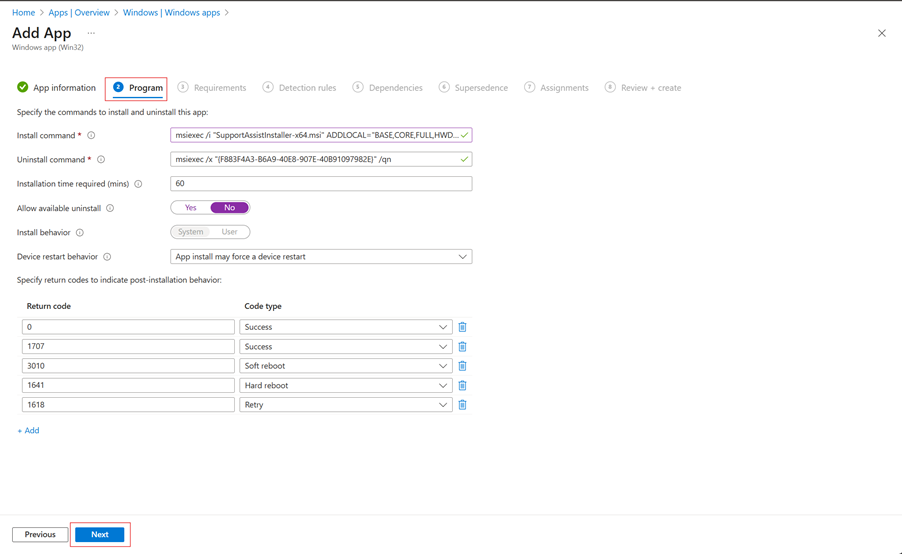
Step 32: Configure Requirements
| Setting | Value |
|---|---|
| OS Architecture | 64-bit |
| Minimum OS | Windows 10 1809 |
| Disk Space | 600 MB |
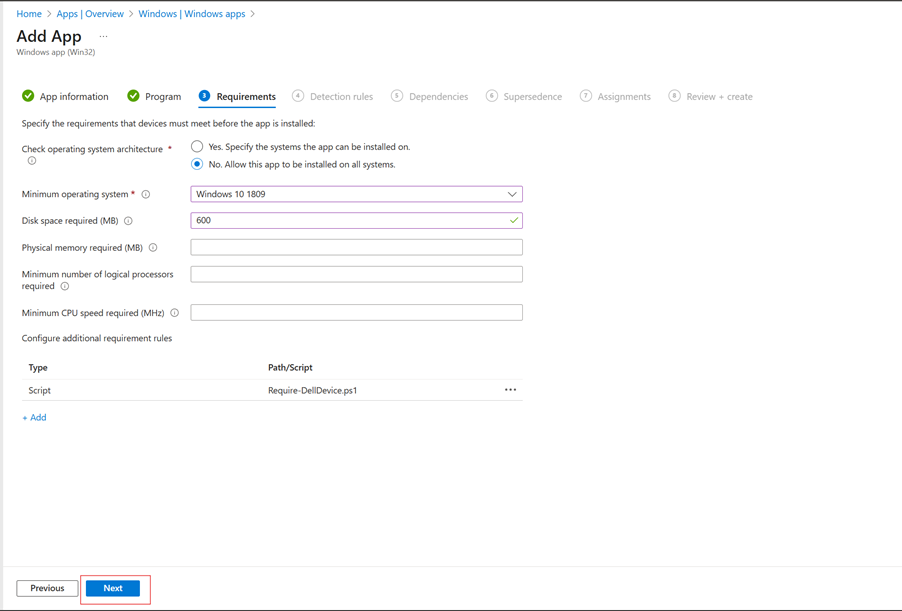
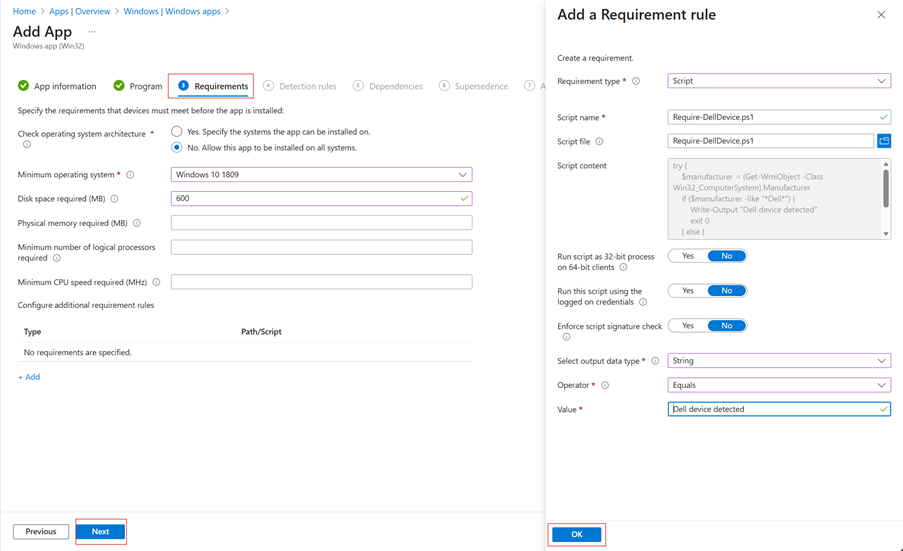
Custom Requirement - Dell Devices Only:
Create Require-DellDevice.ps1:
try {
    $manufacturer = (Get-WmiObject -Class Win32_ComputerSystem).Manufacturer
    if ($manufacturer -like "*Dell*") {
        Write-Output "Dell device detected"
        exit 0
    } else {
        Write-Output "Not a Dell device"
        exit 1
    }
} catch {
    exit 1
}
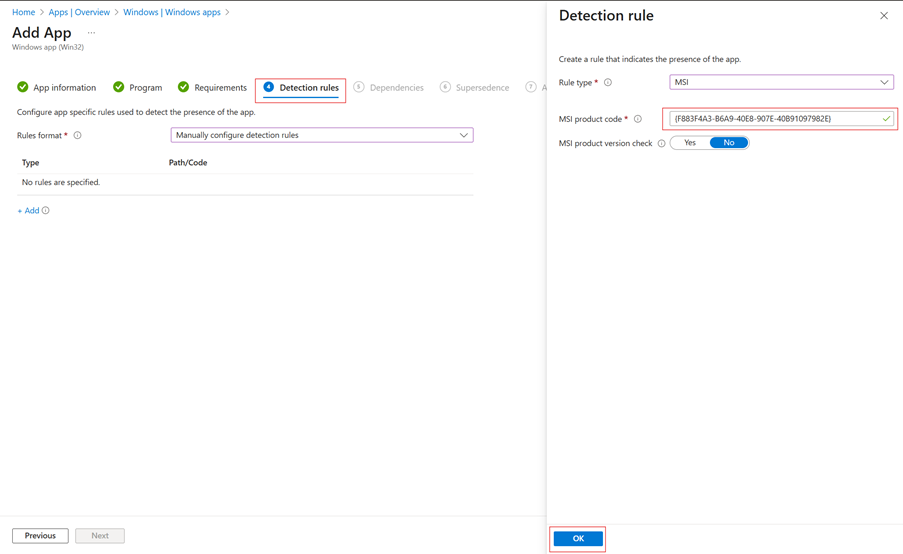
Step 33: Configure Detection Rules
| Setting | Value |
|---|---|
| Rule type | MSI |
| MSI Product code | {F883F4A3-B6A9-40E8-907E-40B91097982E} |
| MSI product version check | No |
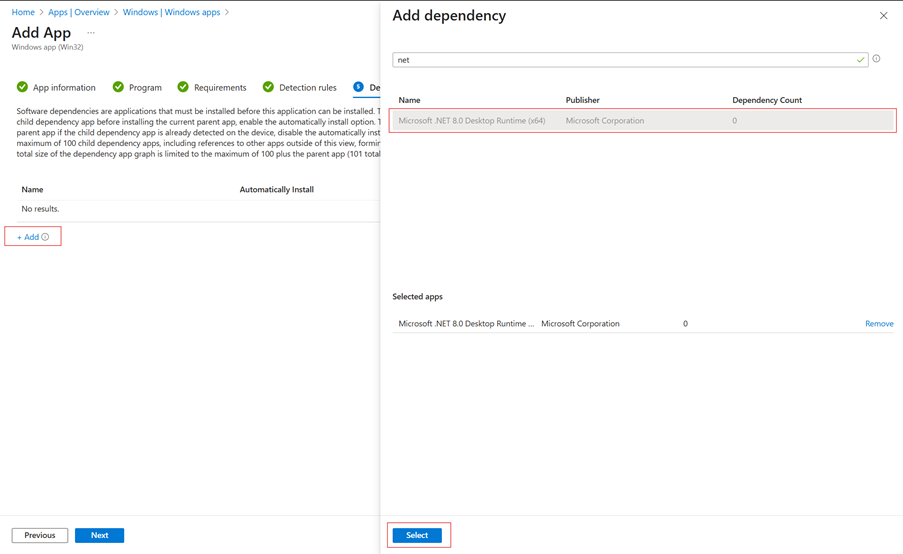
Step 34: Configure Dependencies
- Click + Add under Dependencies
- Select: Microsoft .NET 8.0 Desktop Runtime (x64)
- Dependency type: Detect
- Auto-install: Yes
Step 35: Configure Supersedence (Optional)
If replacing older SupportAssist version, add supersedence rule. Otherwise skip.
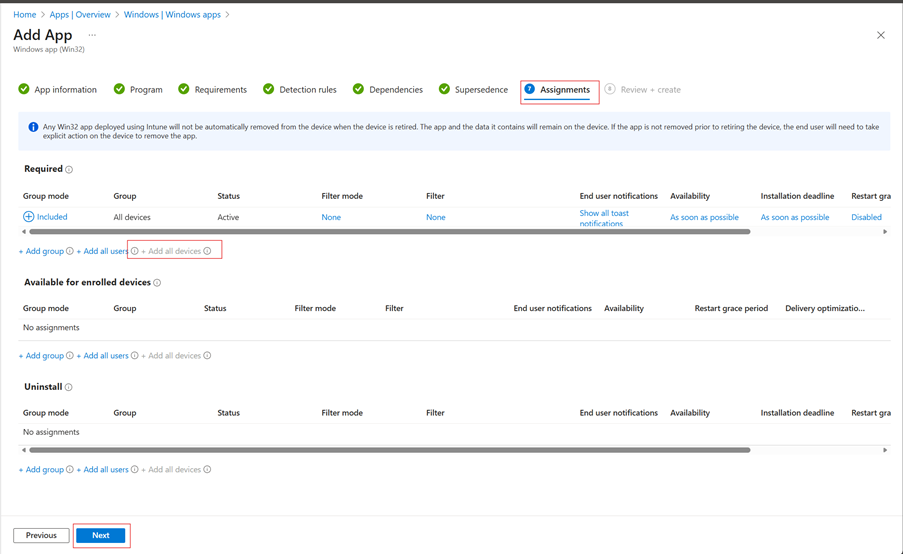
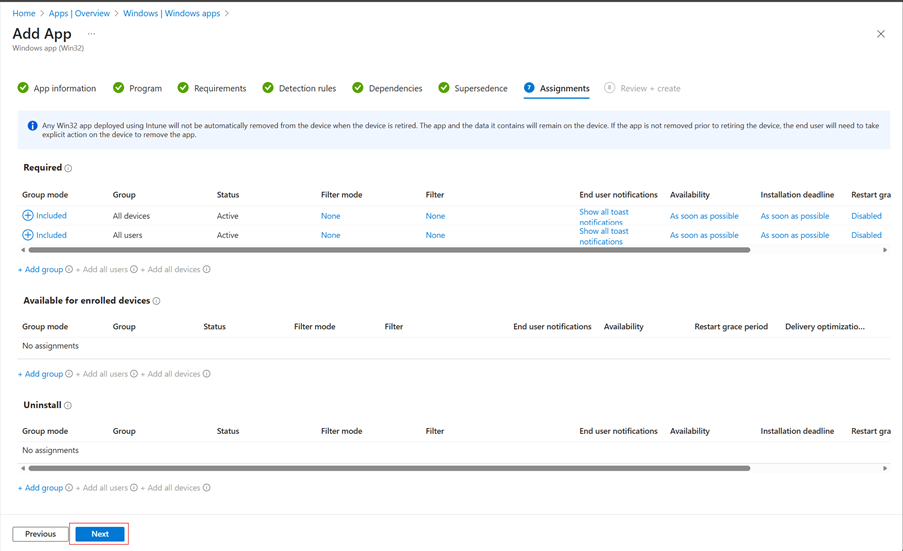
Step 36: Configure Assignments
Pilot Deployment:
- Under Required, click + Add group
- Select pilot group (e.g., IT-Pilot-Dell-Devices)
Production Rollout:
| Week | Target | Devices |
|---|---|---|
| Week 1 | IT Department | 10-20 |
| Week 2 | Department A | 50 |
| Week 3 | Department B | 100 |
| Week 4+ | All Dell Devices | Remaining |
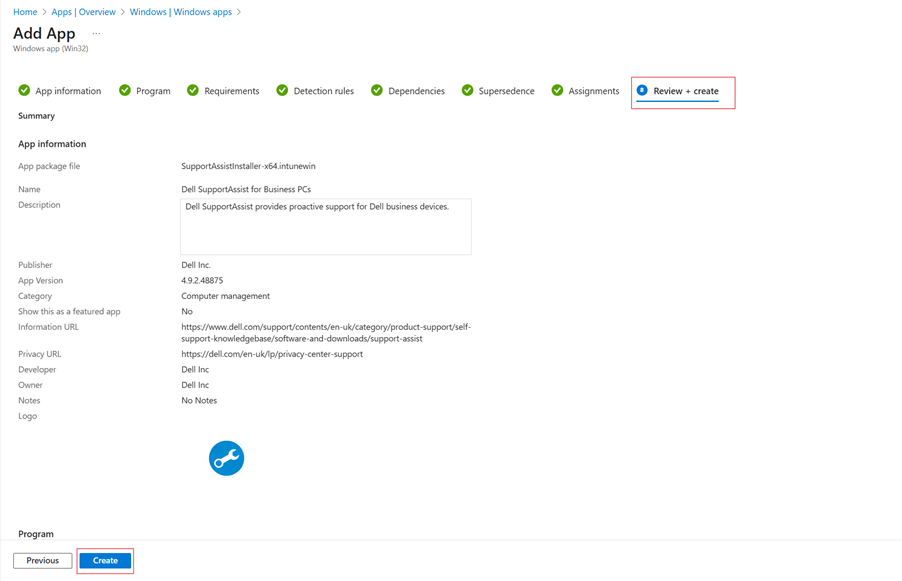
Step 37: Review and Create
- Review all settings
- Verify install command
- Confirm dependencies
- Click Create
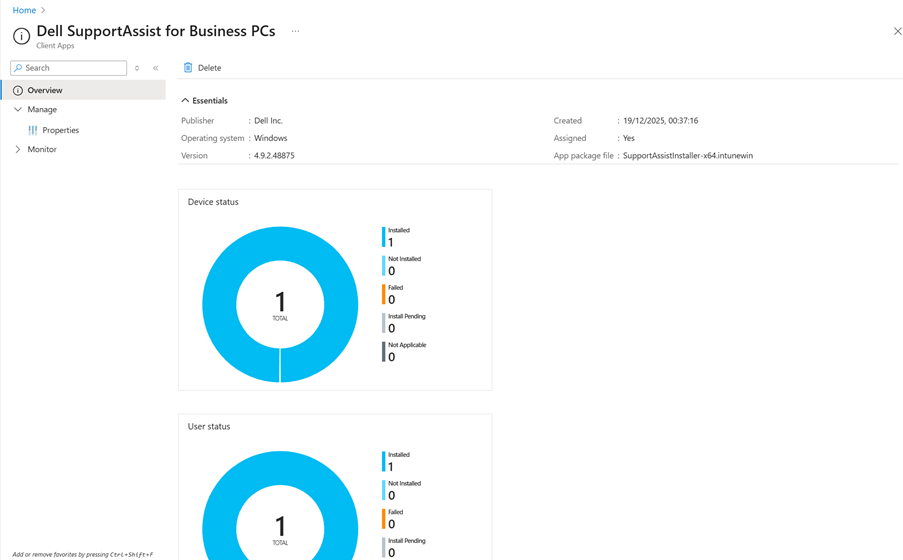
Step 38: Monitor Deployment
- Navigate to: Apps → All apps → Dell SupportAssist
- Click Device install status
- Review progress and failures
| Status | Description |
|---|---|
| Installed | Successfully installed |
| Pending | Waiting to install |
| Failed | Installation failed |
| Not applicable | Not a Dell device |

· Dependency type: Detect
· Auto-install: Yes
Step 24: Configure Assignments
Pilot Deployment:
- Under Required, click + Add group
- Select pilot group (e.g., IT-Pilot-Dell-Devices)
Production Rollout Schedule:
| Week | Target | Devices |
|---|---|---|
| Week 1 | IT Department | 10-20 |
| Week 2 | Department A | 50 |
| Week 3 | Department B | 100 |
| Week 4+ | All Dell Devices | Remaining |
9. Security & Governance
9.1 Data Protection
| Aspect | Implementation |
|---|---|
| Activation File | Store securely; regenerate if compromised |
| CRM Seed Value | Document securely for recovery |
| Network | All communication via HTTPS/TLS |
10. Testing & Validation
Verification Commands
# Check installation
Get-WmiObject -Class Win32_Product | Where-Object { $_.Name -like "*SupportAssist*" }

# Check service
Get-Service -Name "SupportAssistAgent"

# View logs
Get-Content "$env:TEMP\SupportAssist_Install.log" -Tail 50
Validation Checklist
- Installation shows success in Intune
- SupportAssistAgent service is running
- Device appears in TechDirect console
- Hardware diagnostics can be executed
11. Troubleshooting
Common Issues
| Issue | Cause | Solution |
|---|---|---|
| Error 1603 | Missing .NET 8.0 | Install .NET dependency first |
| "Not a Dell device" | Non-Dell hardware | Expected behavior |
| Activation invalid | Expired/corrupted file | Re-download from TechDirect |
| Service not starting | Incomplete install | Check logs; reinstall |
Log Locations
| Log | Location |
|---|---|
| MSI Install | %TEMP%\SupportAssist_Install.log |
| Intune | %ProgramData%\Microsoft\IntuneManagementExtension\Logs\ |
| SupportAssist | %ProgramData%\Dell\SupportAssist\Logs\ |
12. Quick Reference
Install Command
msiexec /i "SupportAssistInstaller-x64.msi" ADDLOCAL="BASE,CORE,FULL,HWDIAGS,INSIGHTS,RAAS" TRANSFORMS="SupportAssistConfiguration.mst" /norestart /qn /l*v "%TEMP%\SupportAssistInstall.log"Deployment Checklist
- Downloaded activation file from TechDirect
- Ran Dell Deployment Package Manager
- Validated activation file
- Configured Central Resource Manager (if needed)
- Selected MST output format
- Generated deployment package
- Verified all files in output
- Deployed .NET 8.0 Runtime
- Created .intunewin package
- Uploaded to Intune
- Configured install command
- Set up detection rules
- Added .NET 8.0 dependency
- Assigned to pilot group
- Monitored deployment
- Verified on test devices
- Expanded to production
Screenshot Reference
Part A: Dell Deployment Package Manager
| Step | Image | Description |
|---|---|---|
| 2 | step1-welcome.png | Welcome screen |
| 3 | step2-activation-invalid.png | Activation error |
| 4 | step3-activation-success.png | Activation success |
| 5 | step4-software-addons.png | Software add-ons |
| 6 | step5-crm-config.png | CRM configuration |
| 7 | step6-proxy.png | Proxy settings |
| 8 | step7-output-format.png | Output format |
| 9 | step8-output-location.png | Output location |
| 10 | step9-generation-progress.png | Generation progress |
| 10 | step10-generation-complete.png | Generation complete |
| 11 | step11-summary.png | Summary success |
| 12 | step12-package-contents.png | Generated files |
Part B: .NET 8.0 Deployment
| Step | Image | Description |
|---|---|---|
| 13 | dotnet-step1-source-files.png | .NET source prepared |
| 14 | dotnet-step2-package-created.png | .NET package created |
| 15 | dotnet-step3-intune-upload.png | Upload to Intune |
| 16 | dotnet-step4-app-information.png | App information |
| 17 | dotnet-step5-program-settings.png | Program settings |
| 18 | dotnet-step6-requirements.png | Requirements |
| 19 | dotnet-step7-detection-rules.png | Detection rules |
| 20 | dotnet-step8-assignments.png | Assignments |
| 21 | dotnet-step9-deployment-status.png | Deployment status |
Part C & D: SupportAssist Intune Deployment
| Step | Image | Description |
|---|---|---|
| 22 | intune-step1-folder-structure.png | Folder structure |
| 23 | intune-step2-files-copied.png | Files copied |
| 24 | intune-step3-tool-downloaded.png | Tool downloaded |
| 25 | intune-step4-package-created.png | Package created |
| 26 | intune-step5-portal-login.png | Intune login |
| 27 | intune-step6-apps-navigation.png | Apps navigation |
| 28 | intune-step7-select-app-type.png | Select app type |
| 29 | intune-step8-upload-package.png | Upload package |
| 29 | intune-step9-upload-progress.png | Upload progress |
| 30 | intune-step10-app-information.png | App information |
| 31 | intune-step11-program-settings.png | Program settings |
| 32 | intune-step12-requirements.png | Requirements |
| 32 | intune-step13-custom-requirement.png | Dell requirement |
| 33 | intune-step14-detection-rules.png | Detection rules |
| 34 | intune-step15-dependencies.png | Dependencies |
| 35 | intune-step16-supersedence.png | Supersedence |
| 36 | intune-step17-assignments.png | Assignments |
| 37 | intune-step18-review.png | Review and create |
| 38 | intune-step19-monitor-deployment.png | Monitor deployment |
| 38 | intune-step20-device-status.png | Device status |